Saturday, July 10, 2021

Eliminating Visible Chunk Edge Lines The Easy Way!

NOTE:  This post and all before it were made during the time when the game was being developed in the UNITY game engine.  The game is no longer being developed in UNITY.  New posts will detail my journey using the Godot game engine.  If you are interested in UNITY, please browse my posts where you might find some very interesting UNITY content.

In my last post, I admitted my chunk engine had another issue I needed to deal with.  The issue had to do with the edge tiles of each chunk not being able to select the appropriate matching edge tile from an adjacent chunk.  This resulted in chunk edge lines that would appear on the map.  Here is an example screenshot.
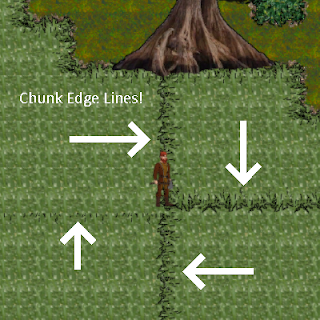
Chunk Engine Fail!

When I sat down today to tackle this problem, I was really apprehensive about how long it would take to address this issue.  My initial thought was to manipulate the chunk sizes to store one extra tile around the chunk so the chunk would know what the adjacent tile was, thus being able to select the appropriate tile sprite.  I Googled and read others had that same line of thinking.  And as I sat looking at the above screen and those ugly chunk lines, it happened!  I had one of those Aha! moments that developers sometimes have.  I remembered how my chunk engine was loading the chunks in a set sequence.  It was like this:
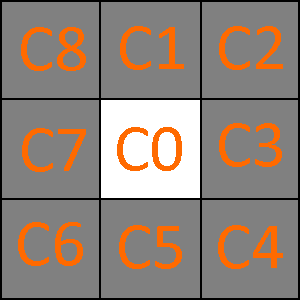
The Flawed Chunk Loading Sequence

C0 is the chunk the player is on.  It is the most important chunk to load, right?  So, I loaded it first!  But that was where I made my mistake.  The reason the chunk edge lines were appearing was due to the fact that I had chosen to load the player's chunk FIRST.  In doing that, I guaranteed the edge tiles would not be right because they had nothing to reference!  So, I decided to change my switch statement around in my chunk loading method from the above order 0-8 to this new 0-8 order.
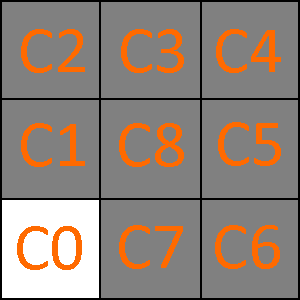
The New and Improved Chunk Loading Sequence

Well, you can just imagine what that did.  Actually, you do not have to imagine because I am going to now show you.
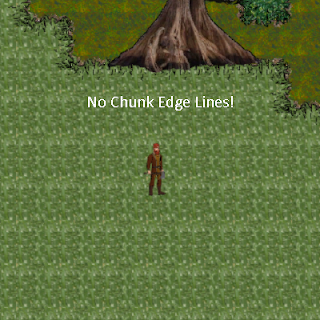
Chunk Engine Success!

By loading the edge chunks first, the center chunk - the most critical - had all the information it needed to eliminate the visible lines.  This simple act of changing the load order essentially pushed the edge lines to the outside of the 9-chunk group rather than the inside.  Since chunks load as the player moves around, the player actually never does see the chunk lines because they never appear in the game window.

You might be wondering what the player sees when those chunks around his character are loading?  Is the character suspended above a black hole of empty tiles while the chunks around him are forming?  No, he isn't.  That's because the player never sees any of this loading take place.  Earlier today, as if it were perfect timing, I wrote a fade-out, fade-in coroutine to hide the game world while it was being formed.  Here is the method.

 1
 2
 3
 4
 5
 6
 7
 8
 9
10
11
12
13
14
15
16
17
18
19
20
21
22
23
24
public IEnumerator FadeScene(float fadeOutSpeed = 25f, float fadeInSpeed = 3f, float waitTime = 1.5f)
        {            
            Color fadeColor = BlackOut.GetComponentInChildren<Image>().color;
            float fadeAmount;
            while (fadeColor.a < 1f)
            {
                fadeAmount = fadeColor.a + (fadeOutSpeed * Time.deltaTime);
                if (fadeAmount > 1)
                    fadeAmount = 1;
                fadeColor = new Color(fadeColor.r, fadeColor.g, fadeColor.b, fadeAmount);
                BlackOut.GetComponentInChildren<Image>().color = fadeColor;
                yield return null;
            }
            yield return new WaitForSeconds(waitTime);
            while (fadeColor.a > 0f)
            {
                fadeAmount = fadeColor.a - (fadeInSpeed * Time.deltaTime);
                if (fadeAmount < 0)
                    fadeAmount = 0;
                fadeColor = new Color(fadeColor.r, fadeColor.g, fadeColor.b, fadeAmount);
                BlackOut.GetComponentInChildren<Image>().color = fadeColor;
                yield return null;
            }
        }   

The method is meant to be called as a Coroutine like this:

StartCoroutine(FadeScene(15f, 1f, 2f));

If you leave off supplying the parameters, the defaults will be used.  The first parameter is the fadeout speed.  For example, 25f will perform a complete fade to black in 4 frames.  The second parameter is the fadein speed.  The last parameter is a wait timer you can use to delay the fadein if you need to allow it to pause longer for longer background work.

Having this method alone will do nothing.  In order to fade the screen, you must have something to adjust the alpha on.  You need a sprite on a canvas object that is expanded to take up the whole screen.  Here is how to do that.

On your canvas object in your scene hierarchy, create a new child canvas and name it BlackOut (or whatever you like).  Make sure it is at the bottom of the list of canvases you have, which will make it the closest to the camera.  Next, set the Rect Transform to stretch in both directions.
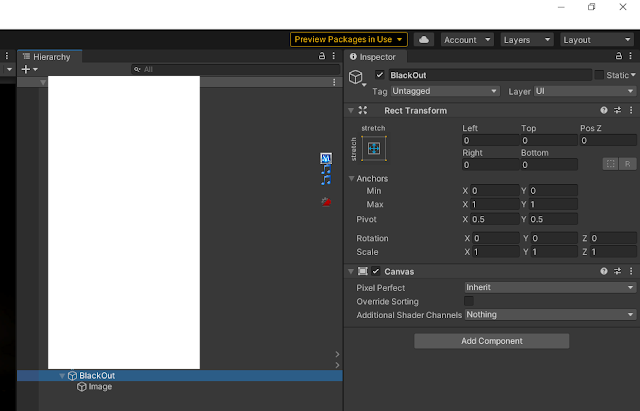
Add a child canvas to the primary canvas in your scene.


Then, add an image as a child of the BlackOut canvas.  Set the image color to black and (this is important) set the alpha to 0 so it is initially transparent.  Be sure to also stretch this Image transform in both directions as you did with the canvas.  
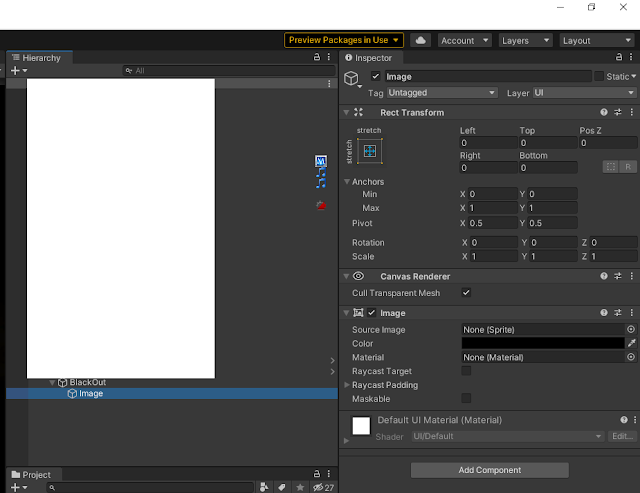
Add an Image to the child canvas and set properties.

Inside the script where you will keep the FadeScene method, create a Public GameObject BlackOut, and then drag the BlackOut canvas object from the Hierarchy to the public property you just exposed.  This will allow the method to find the BlackOut Image.  That's really it.  Once you have this set up, you can use this FadeScene any time you need to fade the scene to do some work without the player seeing what is going on.  It will do both the fade in and fade out in one coroutine.  You don't have to call it again to stop it.  Reuse it anywhere you like.

Going back to the chunk line solution, what I thought would be a huge headache to contend with turned out to be a simple step-back-and-rethink approach that required no new code.  I reassigned the chunks to their new numbered sequence and that was it.  I could beat myself up for not thinking of it at first.  But then, I would not have had this awesome Aha! moment that we developers find so exhilarating!

Until next time....

Sunday, July 4, 2021

Revisiting the Chunking Engine

Last August, I wrote a post about my tilemap chunking engine.  The initial design involved loading 9 chunks of map data around the player, C0 being the chunk the player is on at any given moment.

9 Chunks Around Player

As the player moves around the map, loaded chunks that fall outside this list of 9 need to be saved and unloaded.  Back then I was concerned about figuring out how to unload the adjacent chunks beyond this list of 9 around the player.  Here was my thinking and approach.
"As the player moves around, there is a constant check against the player position and the id of the chunk that is two chunks away from the player's position.  Those need to be saved, then unloaded.  Currently, the check is very precise at exactly 2 chunk sizes away from the player."
The implementation required code that calculated up to 21 chunks at a time.  After coding this approach, I recall how frustrated I was that chunks would get missed when I dragged the player around the map from within Unity's Scene view at runtime.

Recently, it dawned on me that my original design had a very serious flaw.  Any player teleportation code I might add in the future would render my chunk unloading method totally useless.  In that use-case, every chunk outside of the player's new 9 chunks would need to be unloaded, including the previous 9 chunks the player was whisked away from.  It was at that moment I realized I was looking way to narrowly at the problem and the solution was embarrassingly simple.  That is what I wish to share with you in this post.

The chunk engine needs to manage three lists of chunk ids and perform three actions against those lists.  In my engine, a chunk is defined as a 25x25 tile section of the tilemap.  When I create the Perlin-based tilemaps, I store each chunk's tile data in a JSON file, using the filename to indicate the chunkid and tilemap it belongs to (I have multiple tilemaps).  

The first list to manage is the list of chunks that are loaded into memory.  This list must always include the current 9 chunks around the player.  My first method is named CheckChunksToLoad(int direction) in which I pass a direction value in each Update cycle.  I start with 0, the player's chunk, and rotate clockwise from C0 to C8 as shown above.  Using a switch statement, each cycle is responsible for one thing, checking to make sure the chunk at the direction is loaded in memory.  When my direction = 9, it is reset to 0, and the cycle repeats.

The second list to manage is the list of currently loaded chunks EXCEPT the 9 around the player's current position.  For this, I have a second method named CheckChunksToUnload() which creates a new List<int> chunkIdListToKeep.  It builds the current list of 9 chunks that must remain in memory.  Next,  it updates the third list to manage, which is the chunks that must be unloaded.  Elegantly, one line of code updates this list once I know which chunks to keep.

_chunksToUnloadList.AddRange(_loadedChunkIdList.Except(chunkIdListToKeep).ToList());

The third method is responsible for unloading a single chunk from the _chunksToUnloadList, and it does so with each Update().  It is aptly named UnloadAChunk().  This method, which is 15 lines of code, is so much simpler than trying to calculate 21 chunk ids.  If the _chunksToUnloadList.Count > 0, it means a chunk needs to be unloaded.  So, it grabs the first chunkId from the list and calls the method which saves the changes to that chunk and updates the JSON file.  That method also clears the chunk from the tilemaps and frees up memory.  Once this is done, the method ends with two very important lines which removes the chunkId from both managed lists.

_loadedChunkIdList.RemoveAll(i => i == chunkId);

_chunksToUnloadList.RemoveAll(i => i == chunkId);

There are several advantages to the new approach.  I only ever need to calculate the chunkIds of the 9 chunks around the player.  Every other chunk on the map gets cleaned up.  The engine runs faster and provides chunk cleanup regardless of how I manage the player's position.  It just works.

I will leave you with some calculations you might find useful if you are working with a tilemap and need to identify chunks to unload.  

int chunkId = _chunksToUnloadList.First();

int maxChunksWide = _ms / _cs;

int yVal = chunkId / maxChunksWide;

int unloadChunkAtY = (_cs * yVal);

int xVal = chunkId - (yVal * maxChunksWide);

int unloadChunkAtX = xVal * _cs;

The above calculations allow you to determine the 0-based x (horizontal) and y (vertical) coordinates of the first tile in each chunk of the tilemap where the first tile is the bottom-left tile in the chunk and the chunks start in the bottom-left corner of the tilemap.  The _ms variable is the width of the tilemap assuming the tilemap is square.  The _cs variable is the width of a chunk in number of tiles.  As an example, if you have a tilemap that is 125x125 tiles, with each chunk being 25x25, you will have the following sample data.

chunk 0:  y=0, x=0
chunk 1:  y=0, x=25
chunk 2:  y=0, x=50
chunk 3:  y=0, x=75
chunk 4: y=0, x=100
chunk 5: y=25, x=0
...
chunk 24: y=100, x=100

For the curious, I do not use the tile palette or rule-tile system in Unity.  I coded my own rule-tile system which essentially does the same thing (don't ask why).  This means my chunk engine does not (yet) have the ability to handle chunk edge-tile rules which would blend the tiles properly at the chunk edges.  This is something I am aware of and will address in the future.  Likely, the solution will involve loading an extra tile around each chunk so the engine knows what tile exists beyond the edge of the chunk.  But that is another backlog item for the future.  

I hope you found this post interesting.  Please feel free to leave comments.  Thanks for reading along.

Until next time...

Tuesday, February 9, 2021

A Crafting Approach

Thinking about typical survival games brings a few subjects to my mind.  Things like zombies to protect against, open world maps, environmental circumstances to overcome, scavenging for resources, and NPC's to trade with or plunder.  All of those things have their place in the genre.  But one thing is the most important to me above everything else.  Yep, it is crafting!

My generation (I am in my 50's) grew up in an age before computers took over childhood lives.  I have often wondered why sandbox games, especially those with deep, complex and often grindy crafting systems, appeal so much to me and my generation.  I think I have a clue to the answer.  My generation grew up playing with Lincoln Logs, Tinker Toys, Erector Sets, REAL chemistry sets, and a host of other toys which taught us at an early age to be crafters.

Perhaps this is why crafting is so important to me.  It is the essence of my gaming experiences.  I measure almost every game I have ever played by the quality and quantity of the crafting systems. Would it not make perfect sense if I am going to make a game, that I make it with a core focus on crafting?  I think so.  In fact, I don't see any point in making a game without a crafting system as a central core component.

Not only is crafting important to me, it is also important that any crafting system have some intrinsic value outside of the game.  I know it might sound silly, but games which have crafting systems that closely mimic real-world crafts have always held my fascination and attention over magic or fantasy-based games.  I think it is the neatest thing to play a game and learn something about the real world at the same time.  

I am convinced that I can make a brutal survival game experience.  What is difficult is making a crafting system so fun and rewarding that everything else just doesn't matter.  If I can pull that off, I will be happy!  This same concept and mentality can be seen in other games from other developers with different goals.  Consider Dwarf Fortress.  If you haven't heard of it, just stop reading and go play it.  Seriously!  Still here?  Phew, I am glad.  Let me continue.  Dwarf Fortress has just about the least appealing user interface in all of gaming.  Even though there is an overhaul in the works, it is still right now only ASCII characters cleverly used to peek into a world.  There are ten-thousand games with a better user interface.  But there are perhaps no games ever made with more complex systems in them.  The brothers who made and continue to develop that game had a singular goal of making the most complex computer game simulation in the world.  I think they have succeeded.

My goal for A Struggle To Survive is to make a survival game that teaches a little bit of real-life skill within a fun, relaxing, and rewarding game experience - centered around hands-on crafting systems.  Let me move on now to talk about my crafting approach.  I decided early on that I would design the items in the game in the same way as the game system requires.  For example, let's consider a Simple Spruce Bed.

A Spruce Bough

A Spruce Bed

The crafting recipe in the game calls for the player to gather a specific number of Spruce Boughs.  I made the bed sprite literally by taking that same number of Boughs (the first image) and flipping them around and laying them over top of each other until they were thick enough for the bed.  I then outlined the sprite with a black edge to seal it up and voila, I had a Spruce Bed.  Let me give you another example.  Here is the process of creating a Figure 4 Deadfall Trap. 
The player finds 3 sticks and uses them with a knife to produce three spindles.  The three spindles are combined with bait to produce a trigger.  A trigger is then combined with a heavy stone on a tile to set the trap.  Skill will determine whether the trap is set on the first try or if the stone falls and bruises the hand.
A Figure 4 Deadfall Trap Setup and Ready

A Tripped Trap Where The Critter Was Caught.
A Tripped Trap Where The Critter Got Away.


What I want you to notice is that the images of the trigger and the trap were created using the same images the components use.  This is an important part of my crafting system.  The pieces are combined to make the whole.  Let me give you another example.  Let's take a look at what it takes to create a Bow Drill Kit.  The kits ingredients are a firebow, bearing block, fireboard, and spindle:  

short wood stick + animal sinew = firebow.
wood billet makes a wood shingle makes a bearing block.
wood billet makes a wood shingle makes a fireboard.
wood stick makes a spindle.

+=
== 

== 


= 
A Complete Bow Drill Kit

Having that one Bow Drill Kit in the player's inventory will allow the player to create fire when used on an unlit campfire.  I think you get the idea.  I want the same sprites of the various parts to be used to make the whole become the whole.  Here is one final example.  The Fishing Trap.  It is made from medium and short wood sticks tied together with some bark cordage.  We have many to choose from (Maple, Cedar, Spruce, Willow). Let's use the Maple cordage made from a roll of Maple Bark.

 = 

Wood Fish Trap

The fish trap sprite was designed using the short and long sticks.  The cordage is a component required to fit them together.

Well, this is the kind of crafting I will be putting into the game.  I think using the component sprites to "craft" the product sprites is a great way to tie the crafting together in a way that makes sense.  But what do you think?  Do you think this approach makes sense?  Do you think my idea is complete rubbish?  I would love to know your thoughts.  There is much, much more to come.  Thanks for following along.  

Until next time...

Saturday, February 6, 2021

A Change in Name

As of today, Survive And Thrive becomes.....


This is just a quick note to let everyone know that I have changed the name of our game to A Struggle To Survive.  Having spent the last year working under the Survive And Thrive banner, my research into this name led me to the sad conclusion that it was much too common of a phrase to stand out in the crowd.  Not only did I find other games with the same name, I found all sorts of non-game topics that embraced the survive-thrive theme.  I found references with charitable, financial, healthcare, and energy companies.  In fact, the more I looked the more I found.  It is an extremely popular phrase and I don't know why I didn't do this research before now.

Brain-storming with my wife for a possible replacement has led us to this new title which fits the game quite nicely and is sparsely used.  I have just now secured the domain and we will continue under this new and exciting moniker.  Please update your link.

astruggletosurvivedevblog.blogspot.com

My work continues with the Seasons update.  Graphical work is so incredibly tedious!  I have tree sprites all over the place that need to be created or updated to properly show the seasons.  However, I found an exciting new tool to assist me with my winter variations.  It is called Krita, a free and open source paint program.  It inspired me to revamp the Maple tree design to look more like a traditional maple trunk and to drop some snow on those barren branches!  Here is the new deciduous Maple along with the coniferous Spuce.


Until next time...

Sunday, January 10, 2021

A Peek At Seasonal Tree Work

I don't have too much to report this week as I have been working on refactoring code in preparation for a few exciting features.  You might blame this on feature creep, but that's fine with me.  The time system is working great but it lacks one important feature, a calendar!  I figured if I wanted to really make a survival game worthy of the term, I should not skimp and go all-in with 4 seasons.  I believe I have the foundation already laid for snow accumulation and tracks in the snow (for the tracking skill of course).  If I am going to do all that, I really needed to dive into seasonal variations for each of the 19 trees in the game.  I managed to work on the maple tree first as I was really excited to see what the variations of spring, summer, and fall would look like.  Plus, something I have dreaded, stripping off the leaves to see the wintery naked maple tree, turned out to not be as bad as I thought it would be.  Here is a preview of the work which I hope will be good enough for production because I doubt I will have time to come back to trees again.  Keeping it short and to the point, here is the Maple as it will grow and change with the seasons of Survive And Thrive.

Until next time...

The Maple Tree


Sunday, January 3, 2021

A Vision For Survive And Thrive

Happy New Year to all of you.  Before I return to my day job tomorrow I thought I would do a short post and show a video on the progress made during my vacation time.  Believe it or not, working on Survive And Thrive is an enjoyable way to spend some of my time off.

You might be wondering about my vision and goals for this game.  In any worthwhile endeavor one has to have goals or else there is no long-term purpose or destination.  I do have goals for Survive And Thrive and my vision is a fairly lofty one.  However, my wife is careful to say it does not matter to her if I reach those goals or not.  I know why she says that.  She doesn't want me to feel obligated to her to finish this project. She wants me to enjoy the process and if it comes to fruition, great.  But if not, that is ok with her.  I appreciate her attitude and her desire to remove guilt that could come from not finishing this game.  After all, the ratio of games started to games completed is probably somewhere around 1000 to 1.  I knew this going into the project.  I also know that there are a dozen things that could happen to derail the work that might be completely out of my control.  But I look at it this way:  Does someone cancel a road trip because there is a possibility of a break-down or an accident or bad weather?  No, the trip gets planned and executed with the hope none of that happens.  The same is true for this work.  I have a vision for this game and purposes for investing my time and energy.  I am intent on reaching my destination.

So what do these goals look like?  Obviously from the title, I am making a survival game.  But the definition of a survival game in 2021 is far different than it might have been fifteen or twenty years ago. When the word "survival" is used today to describe a game, inevitably gamers think zombies and the apocalypse.  Scenes of hopeful survivors scavenging for food, weapons, armor and shelter set the backdrop of most survival games these days.  I think that aspect of the survival genre is well represented. I have absolutely no desire to add Survive And Thrive to that mix.  There will not be a single zombie in this game.  The world will not be torn apart or ravaged by some virus or plague.  The player will not have to hide at night from unnatural dangers, nor scavenge during the day through a desolate landscape.  I want this game to be different from that.  Survive And Thrive will be a game about survival skills and living off the land set in the context of a wild and beautiful wilderness that is procedurally generated and alive.

When I think of survival in a wilderness environment, many things come to mind that illustrate it.  I think of mountain men in the American wildernesses of the 1700's and  1800's.  I think of trappers, pioneers and homesteading families facing the real dangers of an unknown land and a hard life.  When I think of survival skills, I think of foraging for berries, fruit, mushrooms and worms.  I think of hunting, fishing, trapping, making fire, cooking, camping, constructing, and living practically off the land.  I think about television shows like Les Stroud's Survivorman that teaches primitive skills and coping with the unknowns.  I think about the wildly popular unspoken talents of the young man who produces Primitive Technology on YouTube and being able to make shelters, baskets, pottery, ovens and forges.  I think of the natural dangers of predator animals that roam the wilderness: bears, wolves, mountain lions, and even bison.  I think of the seasons with their varying temperatures, staying warm or cool and surviving natures fury as well as physical sickness, disease, and treatment of injuries.  These are the survival aspects I am considering.

Thriving comes later as experience lends to a build-up of skills necessary to plant a garden, prepare hides, tan leather, carve wood, make pottery, build cabins, smokehouses, chicken coops, barns, and blacksmith shops.  Also, trading furs and other goods with NPC's in small villages for things the player may not be able to make like steel traps and horseshoes.  Perhaps I will be able to work in gun powder, smooth bore muskets and pistols in addition to bows, traps, swords and axes.  There really is so much to consider in the time period I am looking at.  While I am focusing on the general life of the 1700-1800s, I am not going to venture into the politics of those times, namely, the Native Americans and their struggles with the White Man.  My great-great grandmother was Cherokee and I am not insensitive.  It is just that a game is a game and politics are politics and I don't want my game to be a venue for that discussion.  Rather, I would like to simulate the earlier times when everyone was mostly cordial and friendly and the frontier was big enough for encroachment to not be a concern.  I am not striving for historical accuracy by any means.  The time period will be a source of inspiration only.  I haven't decided yet whether the natural tendencies of sinful man will be represented in the NPC population, such as robbers, cattle-rustlers, murderers and vigilantes.  If it were, that would be several versions beyond a release so I am not going to focus on that at all.

Now that I have my feet wet in Unity and can actually see a path to my goals, I am very excited to proceed with development into this second year.  This is not a sprint, though I will have many of them to work through (pun intended).  This is a marathon of creativity and ideas that I hope to weave into a tapestry of fun and challenging gameplay mixed with perhaps some practical knowledge.  I have no way of knowing what the end looks like or how long it will take me to get there, but this is my vision nonetheless.

I want to end this post with a short video showing some of the latest development of the game.  Feel free to leave comments on it and anything else.  If my vision is something you might be interested in, I would like to hear about it.  


Until next time...