NOTE: This post and all before it were made during the time when the game was being developed in the UNITY game engine. The game is no longer being developed in UNITY. New posts will detail my journey using the Godot game engine. If you are interested in UNITY, please browse my posts where you might find some very interesting UNITY content.
In my last post, I admitted my chunk engine had another issue I needed to deal with. The issue had to do with the edge tiles of each chunk not being able to select the appropriate matching edge tile from an adjacent chunk. This resulted in chunk edge lines that would appear on the map. Here is an example screenshot.
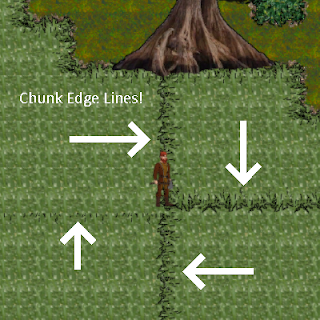 |
| Chunk Engine Fail! |
When I sat down today to tackle this problem, I was really apprehensive about how long it would take to address this issue. My initial thought was to manipulate the chunk sizes to store one extra tile around the chunk so the chunk would know what the adjacent tile was, thus being able to select the appropriate tile sprite. I Googled and read others had that same line of thinking. And as I sat looking at the above screen and those ugly chunk lines, it happened! I had one of those Aha! moments that developers sometimes have. I remembered how my chunk engine was loading the chunks in a set sequence. It was like this:
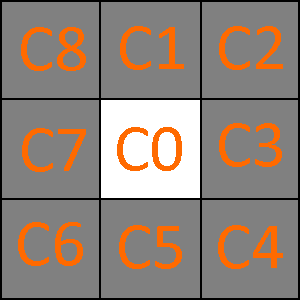 |
| The Flawed Chunk Loading Sequence |
C0 is the chunk the player is on. It is the most important chunk to load, right? So, I loaded it first! But that was where I made my mistake. The reason the chunk edge lines were appearing was due to the fact that I had chosen to load the player's chunk FIRST. In doing that, I guaranteed the edge tiles would not be right because they had nothing to reference! So, I decided to change my switch statement around in my chunk loading method from the above order 0-8 to this new 0-8 order.
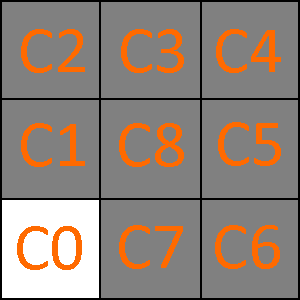 |
| The New and Improved Chunk Loading Sequence |
Well, you can just imagine what that did. Actually, you do not have to imagine because I am going to now show you.
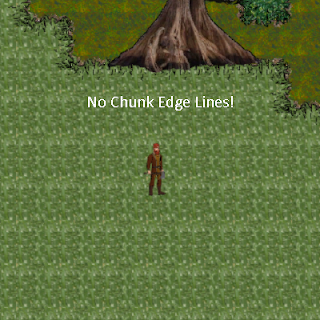 |
| Chunk Engine Success! |
By loading the edge chunks first, the center chunk - the most critical - had all the information it needed to eliminate the visible lines. This simple act of changing the load order essentially pushed the edge lines to the outside of the 9-chunk group rather than the inside. Since chunks load as the player moves around, the player actually never does see the chunk lines because they never appear in the game window.
You might be wondering what the player sees when those chunks around his character are loading? Is the character suspended above a black hole of empty tiles while the chunks around him are forming? No, he isn't. That's because the player never sees any of this loading take place. Earlier today, as if it were perfect timing, I wrote a fade-out, fade-in coroutine to hide the game world while it was being formed. Here is the method.
 1
 2
 3
 4
 5
 6
 7
 8
 9
10
11
12
13
14
15
16
17
18
19
20
21
22
23
24 | public IEnumerator FadeScene(float fadeOutSpeed = 25f, float fadeInSpeed = 3f, float waitTime = 1.5f)
{
Color fadeColor = BlackOut.GetComponentInChildren<Image>().color;
float fadeAmount;
while (fadeColor.a < 1f)
{
fadeAmount = fadeColor.a + (fadeOutSpeed * Time.deltaTime);
if (fadeAmount > 1)
fadeAmount = 1;
fadeColor = new Color(fadeColor.r, fadeColor.g, fadeColor.b, fadeAmount);
BlackOut.GetComponentInChildren<Image>().color = fadeColor;
yield return null;
}
yield return new WaitForSeconds(waitTime);
while (fadeColor.a > 0f)
{
fadeAmount = fadeColor.a - (fadeInSpeed * Time.deltaTime);
if (fadeAmount < 0)
fadeAmount = 0;
fadeColor = new Color(fadeColor.r, fadeColor.g, fadeColor.b, fadeAmount);
BlackOut.GetComponentInChildren<Image>().color = fadeColor;
yield return null;
}
}
|
The method is meant to be called as a Coroutine like this:
StartCoroutine(FadeScene(15f, 1f, 2f));
If you leave off supplying the parameters, the defaults will be used. The first parameter is the fadeout speed. For example, 25f will perform a complete fade to black in 4 frames. The second parameter is the fadein speed. The last parameter is a wait timer you can use to delay the fadein if you need to allow it to pause longer for longer background work.
Having this method alone will do nothing. In order to fade the screen, you must have something to adjust the alpha on. You need a sprite on a canvas object that is expanded to take up the whole screen. Here is how to do that.
On your canvas object in your scene hierarchy, create a new child canvas and name it BlackOut (or whatever you like). Make sure it is at the bottom of the list of canvases you have, which will make it the closest to the camera. Next, set the Rect Transform to stretch in both directions.
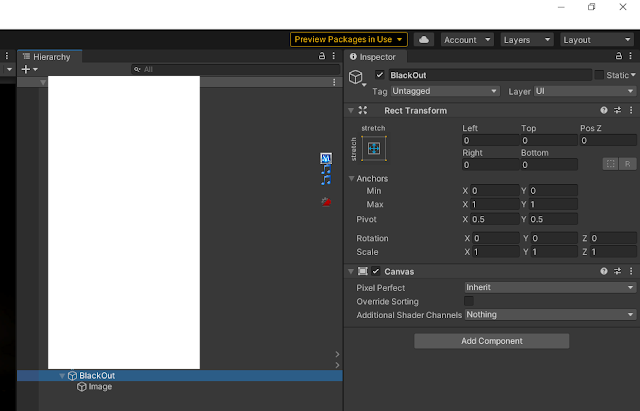 |
| Add a child canvas to the primary canvas in your scene. |
Then, add an image as a child of the BlackOut canvas. Set the image color to black and (this is important) set the alpha to 0 so it is initially transparent. Be sure to also stretch this Image transform in both directions as you did with the canvas.
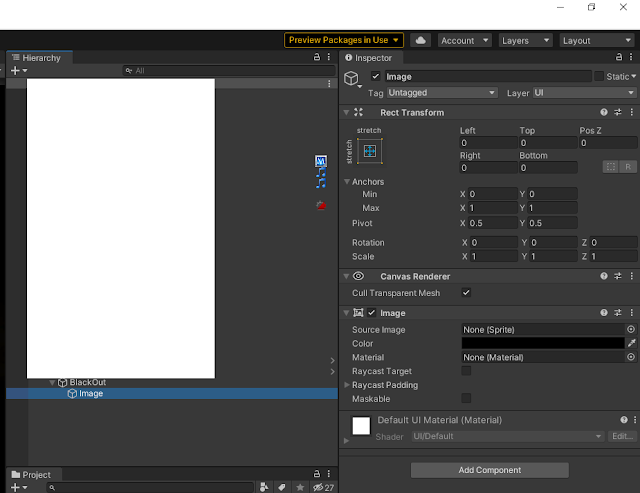 |
| Add an Image to the child canvas and set properties. |
Inside the script where you will keep the FadeScene method, create a Public GameObject BlackOut, and then drag the BlackOut canvas object from the Hierarchy to the public property you just exposed. This will allow the method to find the BlackOut Image. That's really it. Once you have this set up, you can use this FadeScene any time you need to fade the scene to do some work without the player seeing what is going on. It will do both the fade in and fade out in one coroutine. You don't have to call it again to stop it. Reuse it anywhere you like.
Going back to the chunk line solution, what I thought would be a huge headache to contend with turned out to be a simple step-back-and-rethink approach that required no new code. I reassigned the chunks to their new numbered sequence and that was it. I could beat myself up for not thinking of it at first. But then, I would not have had this awesome Aha! moment that we developers find so exhilarating!
Until next time....


